Foundry Mari – A Workflow Journey
INTRO
The last few years saw my career steering from look dev, to grooming, then to shader writing and pipeline, and lately… CG Sup and project managing.
This natural flow got me a bit disconnected from what I started in this industry for in the place! I always been there in the trenches no matter what, but wanted to put myself to the test again.
So, after a long time of procrastinating, I wanted to get back on the horse and get my hands dirty, solo-style.
But how? well, first, I needed a plan, a workflow. As a lead or sup, I’m always preaching about the beauty of planing/prepping/reusing, so its time to practice what you preach!
With this I mind, I needed a goal…
THE GOAL
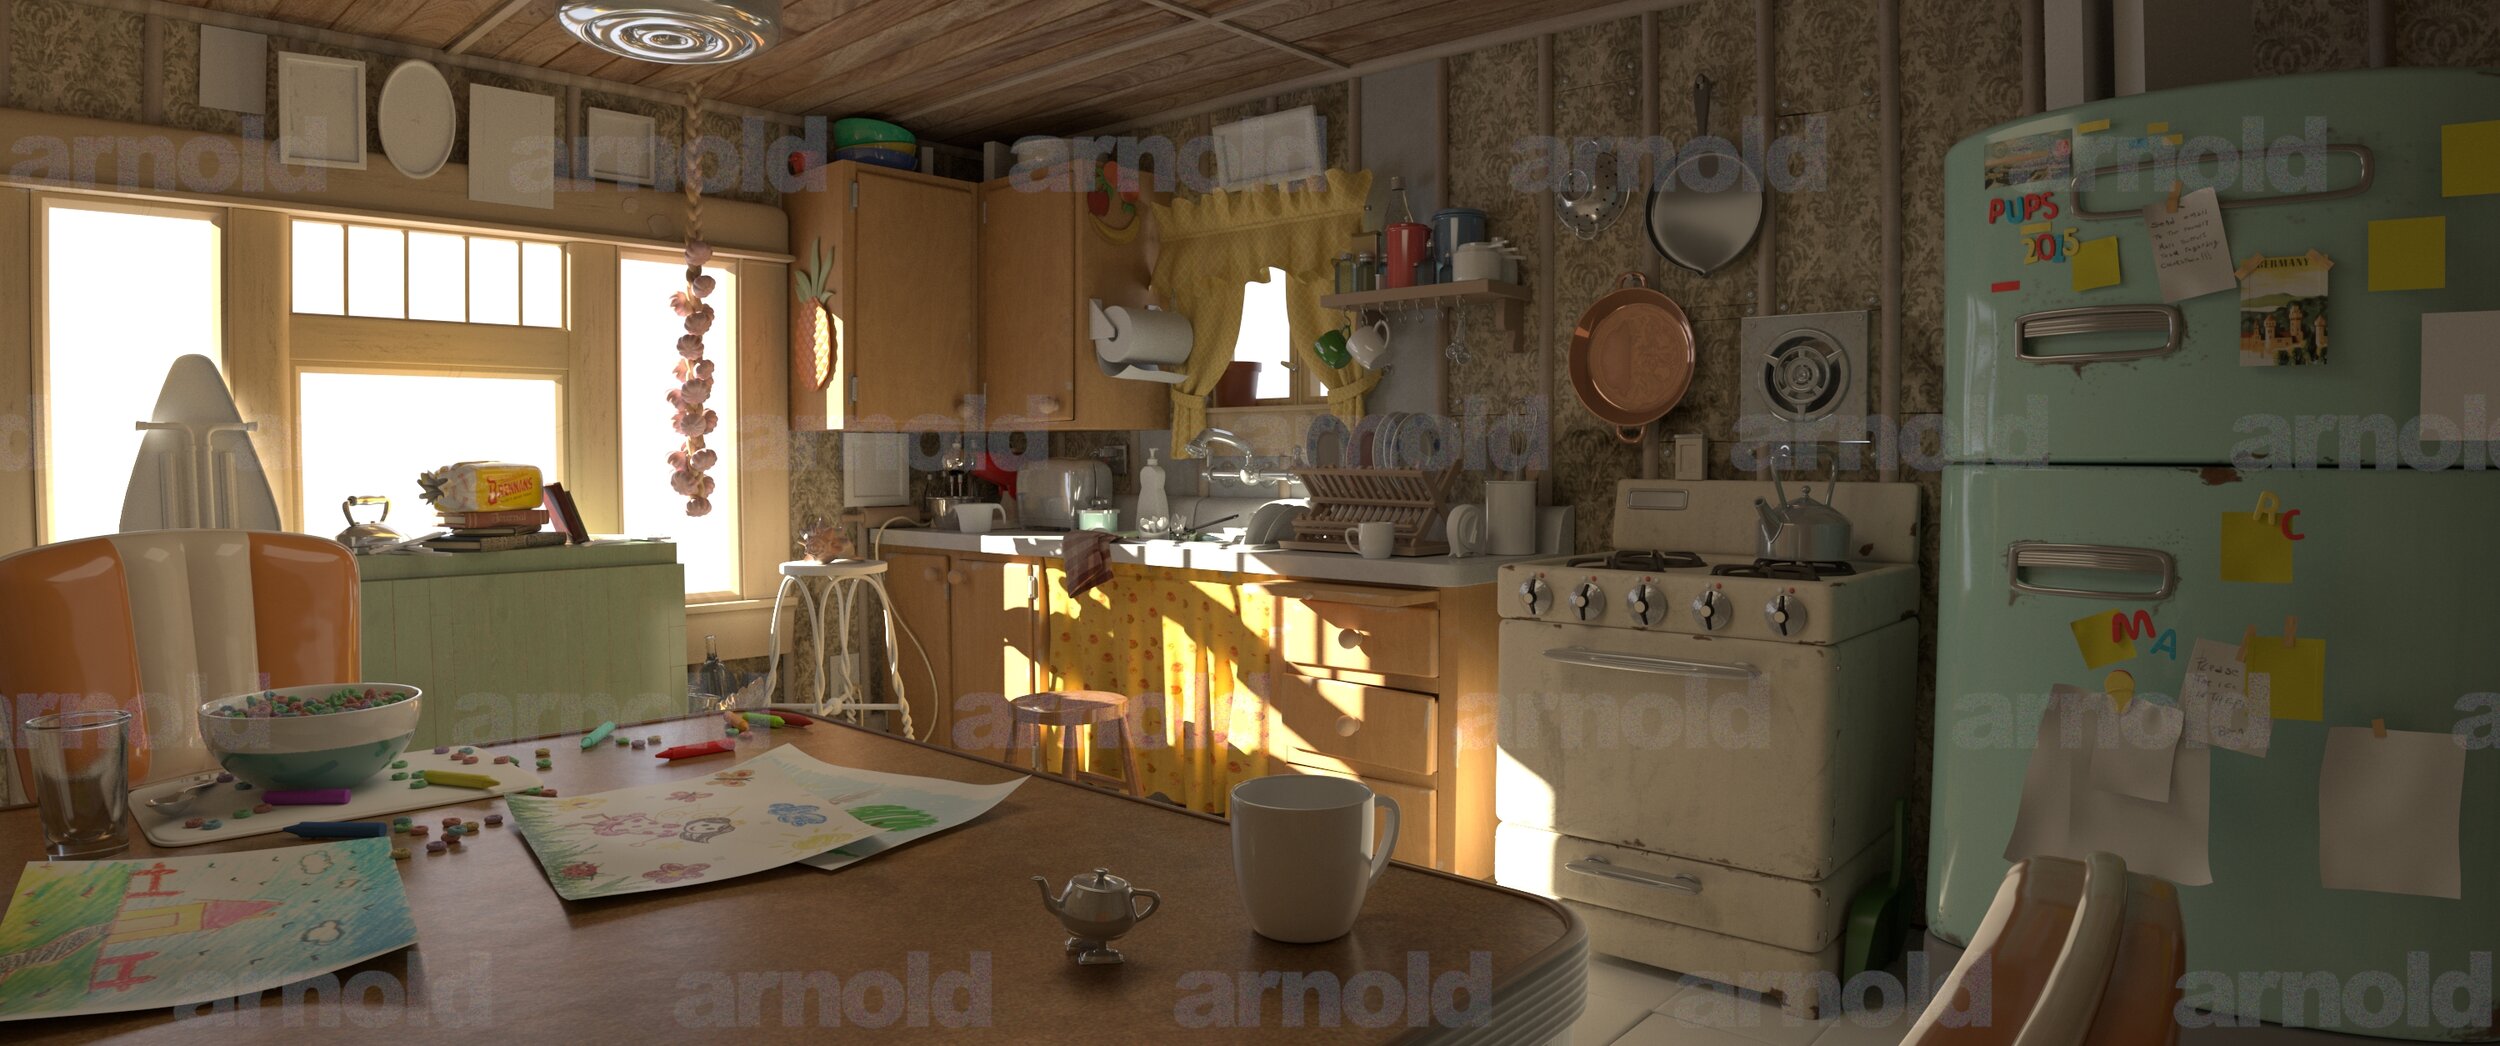
Speed texturing the Pixar PUP Kitchen challenge. Thats the goal, Why not, sounds fun!
For this, I’m trying to recreate the Kitchen Challenge Submission from Fabio Rossi Sciedlarczyk.
If you haven’t seen it, google it, Amazing work, no wonder it won the challenge!!!
I’ll be focusing on the workflow, tools, and speed texturing, so it makes sense to try to mimic his work, and abstract this exercise from the visual developing process.
So lets pretend his image, is a really really good shader and texturing Callout that I’ll try to match 🙂
The Results
@7 Hours mark of speed Texturing Work +
3 hours of shaders and lighting+
3 hours converting the mari projects to ACEScg (not documented here)


@ the 7 Hours mark of speed Texturing Work I had something I could start working on (342 texture files exported from mari), extremely simply shaders and lighting in katana for a quick view,
THE PROCESS
Software:
To make things more interesting, I will be using Maya, Mari, Katana, and Arnold (sorry pixar! next time! I promise!)
I never worked with Mari or Katana before… This will definitely be extra-double fun! 🙂
Pre-requirements, and the long to-do list i need before I start:
I’m lazy -that’s why I like coding- so i need some kind of glue in Katana to bring everything together from Maya and Mari with little effort 🙂
A nice tile texture library, with lots of different texture sets. Update: 2071 texture sets so far, that’s a pretty good library!
Some tools to for the texture library, to check names, formats, depth, create thumbnails, txs, etc
Set up a consistent, intuitive, and straightforward colorspace workflow
More Tools -this time for Mari- to import texture sets files into the current object channels, all sharing the same manifold tiling node for convinience
After the first encounters with mari, I added this to the list (keep reading the next sections to see why):
A custom colorspace file for Mari
Custom channel presets for Mari
A small interface to switch channels, to keep the colorspace in sync
Another tool to create and refresh all the channel connections to a AiStandard Shader to quickly visuale and approximation of what I’m doing.
And the last one, to batch export channels, I hate the mari export all window popping up for every single bloody channel!
Mmmhh… I think that is it, I better get on it!
PART ONE – Gluing Maya-Mari-Katana together
One of the most time consuming processes when look deving sets, is creating the shaders. As in: Assigning the all correct textures to all the shaders, and then assigning them to all the correct objects.
In a set with dozens or hundreds of objects, with several map types each, and udims…. this can be a painful and error prone process. Also because I’m a bit lazy and I hate doing this specific thing. So boring…
I needed to have a way to bulk read textures and bulk assign shaders…. here katana comes into play with its amazing workflow.
A few late nights and few hundreds of python lines later, i got something worth using to partition a big file into different mari projects, merging geos, and adding attrs to track everything when we are down the pipe.
Disclaimer: Yeah I should have split up the set into small assets, but liked the idea of the challenge of having to split the maya file into different mari projects, tracking that, and putting it all back together at the end.
PART TWO – Mari Colorspace – Presets and config files
We all know -or you will learn soon enough after starting to work in mari- the colorspace settings are cluttered, non intuitive, and far from artist friendly.
My definition of a “consistent, intuitive, and straightforward colorspace workflow”:
Simply… Mari textures should be linear. Color textures should get a view color transform to paint in the target colorspace. No view color transform for scalar textures like specular weight.
More simply said: what you paint, what you see, is what you will see coming out from the render. Period
Mari will export all linear exrs that you can convert straight to .txNo BS as you usually see in tutorials and youtube videos as adding a gamma adjustment layer before exporting, or using txmake with –colorconvert sRGB to linear only for certain textures. Non sense
First of all, I found counter intuitive that the arnold VFX channel presets are all linear space (with its own colorspace settings inside the preset file), yet the default mari colorspace settings (the nuke-default) sets most channels types as sRGB. Confusing…
This means that creating a channel with the same depth type from the arnold presets will yield a different colorspaced channel than doing so from the mari create channel window.
But worry not! The Mari 3.x default color settings will let you use the arnold preset channels properly.
I also created a new set of arnold channel presets, with names corresponding to the latest arnold 5 (or MToA/KToA 2.x) standardSurface.
Their setup is pretty similar to the arnoldl mari presets, you can use those to make sure the channels are correctly setup for colomanagement.
This will make all your Mari textures linear, and only the “color” ones will get view transformed -in the viewport- to the proper color.
You can paint the colors in the target colorspace, and rest asure that all the textures will go straight into arnold or renderman without any error prone post processing or color convertion for certain channels only.
That is, only if they are exported to .exr format 🙂
Wanna see how this works, and double check your project and channels are set up correctly?
-create a baseColor (from the arnold presets), and a specular
-select the baseColor, disable and enable the view transform, see how the color changes?
-now, select the specular channel, disable and enable the view transform, see how the color does not change?
PART THREE – Mari Colorspace – The sync issue
But if you don’t like to merge the geometry when importing it to the mari project (like me), you probably found this.
The most important thing for a texture artists is painting in the colorspace they need to paint, they don’t need to (and most usually don’t even want to) know about colorspaces.
And let’s be honest, at this point in my life neither do I.
To make things more complicated on the colorspace front, Mari is optimized (as it states on its website) to work on a single object.
This brings us this two main headaches for technical and non technical artists as well:
The viewport color transform depends directly on the current selected channel of the object. It cares not for any active channel in other objects being displayed.
As in, “does the current selected channel -from the current geo– needs to be transformed? if Yes, do the color transform to the whole viewport”The custom shaders (for ie: the AiStandard) knows nothing about colorspace, is colorspace blind. It uses the current selected channel as the color, effectively applying the transform either it needs it or not.
So, to keep everything in sync and correctly dispayed while paintig, you need to be extra careful on two simple things:
1- That all the objects have the same selected current channel.
2- Not using a custom shader while painting!
Knowing the source of the problem, and what causes the view transform “outta sync”, we can break it down into these Two things of utterly importance for artists when texturing:
keeping all the current channels in sync, all objects must have the same current channel
Always keep the current shader as “Current Layer” while painting
Only use a custom shader (for ie: AiStandard) as the current shader, when you actually want to see the representation on the viewport.
This is because the current channel (doens’t matter which) will be feed to the shader diffuse color, and the shader will color transform this channel it as if it was the baseColor.
For The solution! (…more likely the workaround) see part five!!!
PART FOUR – Workflow – The Texture Library
Prepping and planning is the best you can do in… basically anything!
Texturing is no different, so for texturing prepping i armed myself with a texture library.
The library contains texture sets, each set can contain only one or few tileable maps (diffuseColor, specular, bump, etc, etc).
This is the texture Set Folder content

This is the texture Set Folder content

This is a search in the library folder for *wood*Preview. 762 hits! That’s wood material right there.
Each image represents a texture set, that set contains all the extra map types too.
Number fun, at the time of writing I had:
2,071 Texture sets
4,945 Texture files
4,945 tx files
157 Gb worth of textures
…that will do, I think I have enough to get me started. Lets move to the next section.
PART FIVE – Workflow – The Library Tools
When having thousands and thousands of files, its important to have an automated tool to make sure the files are correctly placed, named, format, etc. Well… is always important to make the computer check things that you might miss!
For this, I wrote a couple of tools:
name, format, depth, and type (diffuse, specular, etc) validation
thumbnail and .json file creation
UPDATE: Mari 4 texture library panel is too slow to show more than 2000 thumbnails, dropped the json file for nowtx file creation, –colorconvert flag according to the map type
Mari import all files in a texture set folder, to the correspondent channel, sharing a manifold node for tiling.